If you are planning to refinish your wood floor because it already looks old, it is necessary for you to sand it first. One of the most common misconceptions is that sanding wood floors is a really hard task that should be entrusted to professionals. However, this is actually an easy task that can be accomplished as long as you have the right tools and materials along with some knowledge on how to do it properly. In this article, I'm going to give you a detailed tutorial on how to sand wood floors yourself.
1. Do the necessary preparations.
Sanding wood floors can be really noisy and dusty so it would be better to use earplugs and face masks especially if you have asthma or other respiratory problems.
Prepare the room by removing ALL pieces of furniture and covering the small openings below the doors as well. You can do this with the use of tape and this step is necessary to ensure that the dust will not spread to other parts of the house. Aside from that, it would be better if you remove the window covers to allow proper air circulation and also because these coverings will only get covered with dust.
After emptying the room, check if there are any loose wood boards and nail them down. Aside from loose wood boards, you must also check the nails carefully. Make sure that they are not sticking out because they may damage the sanding belt or even the sanding equipment itself and cause you extra expenses. Just drill the nails down to avoid this kind of problem.
2. Rent the right kinds of sander.
For sanding wood floors, you will need a drum, edging, and corner sander. Make sure that you rent these different kinds of equipment from specialty shops and buy sandpapers with the right shape and size. It would be better if you buy on the same shop where you rented the equipment just to make sure that the sandpaper will fit well.
3. Prepare and operate the sanders properly.
Drum Sander
Using a screwdriver, remove the covering and retaining strip and place a sandpaper. Make sure that the sandpaper is properly aligned and put the retaining strip together with the other coverings to their original place. Don't forget to check the screws to ensure that the equipment will work properly.
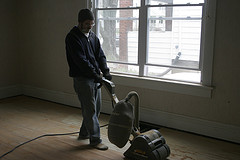
Plug in the equipment and start it. You have to run the drum sander diagonally and after that, operate it again but this time following the direction of your floor grain patterns.
Edging Sander
Edging sanders have retaining bolts that can be opened using a bolt key that comes with the equipment. Open this retaining bolt and place the right shape of sandpaper. Seal the retaining bolt again and as the name suggests, use it to carefully sand the edges of the room that the drum sander wasn't able to reach.
Corner Sander
Replacing the sandpaper of corner sanders is the simplest among these three types of sanders. You wouldn't need any screwdrivers or bolt keys, you just have to simply remove the old sandpaper and place the new one. Corner sanders will enable you to sand areas that the drum and edging sanders fail to reach, especially the corners.
4. Clean the room
As previously mentioned, doing this task is messy. So after sanding the wood floor completely, just sweep with a broom or vacuum the floor to remove the wood dust. If there are still stubborn pieces of dirt and debris left behind, wipe the floor with a damp piece of cloth to remove them.
After doing the simple steps provided in this article on how to sand wood floors, you are now ready to refinish your floor.
Final Words...
With all these detailed and step-by-step instructions in sanding wood floors, you will surely be able to do this task like a PRO. Just remember that pet urine on wood floors leave permanent marks and the only way to solve this efficiently is to remove and replace the particular part of your wood flooring.
1. Do the necessary preparations.
Sanding wood floors can be really noisy and dusty so it would be better to use earplugs and face masks especially if you have asthma or other respiratory problems.
Prepare the room by removing ALL pieces of furniture and covering the small openings below the doors as well. You can do this with the use of tape and this step is necessary to ensure that the dust will not spread to other parts of the house. Aside from that, it would be better if you remove the window covers to allow proper air circulation and also because these coverings will only get covered with dust.
After emptying the room, check if there are any loose wood boards and nail them down. Aside from loose wood boards, you must also check the nails carefully. Make sure that they are not sticking out because they may damage the sanding belt or even the sanding equipment itself and cause you extra expenses. Just drill the nails down to avoid this kind of problem.
2. Rent the right kinds of sander.
For sanding wood floors, you will need a drum, edging, and corner sander. Make sure that you rent these different kinds of equipment from specialty shops and buy sandpapers with the right shape and size. It would be better if you buy on the same shop where you rented the equipment just to make sure that the sandpaper will fit well.
3. Prepare and operate the sanders properly.
Drum Sander
Using a screwdriver, remove the covering and retaining strip and place a sandpaper. Make sure that the sandpaper is properly aligned and put the retaining strip together with the other coverings to their original place. Don't forget to check the screws to ensure that the equipment will work properly.
Plug in the equipment and start it. You have to run the drum sander diagonally and after that, operate it again but this time following the direction of your floor grain patterns.
Edging Sander
Edging sanders have retaining bolts that can be opened using a bolt key that comes with the equipment. Open this retaining bolt and place the right shape of sandpaper. Seal the retaining bolt again and as the name suggests, use it to carefully sand the edges of the room that the drum sander wasn't able to reach.
Corner Sander
Replacing the sandpaper of corner sanders is the simplest among these three types of sanders. You wouldn't need any screwdrivers or bolt keys, you just have to simply remove the old sandpaper and place the new one. Corner sanders will enable you to sand areas that the drum and edging sanders fail to reach, especially the corners.
4. Clean the room
As previously mentioned, doing this task is messy. So after sanding the wood floor completely, just sweep with a broom or vacuum the floor to remove the wood dust. If there are still stubborn pieces of dirt and debris left behind, wipe the floor with a damp piece of cloth to remove them.
After doing the simple steps provided in this article on how to sand wood floors, you are now ready to refinish your floor.
Final Words...
With all these detailed and step-by-step instructions in sanding wood floors, you will surely be able to do this task like a PRO. Just remember that pet urine on wood floors leave permanent marks and the only way to solve this efficiently is to remove and replace the particular part of your wood flooring.
 RSS Feed